Installing a mini gps tracker on your motorcycle is one of the smartest decisions you can make as a rider or fleet owner. Whether you are protecting a high-value cruiser, a daily commuter bike, or an entire fleet of delivery motorcycles, having a reliable and discreetly mounted mini gps tracker gives you real-time visibility, theft deterrence, and peace of mind. The challenge for most riders is not choosing to install one — it is knowing exactly how to do it correctly so the device performs at its full potential from day one.
This guide walks you through every critical stage of the process — from selecting the right mounting location to completing the wiring, configuring the platform, and verifying the system is live. A properly installed mini gps tracker stays hidden from thieves, maintains strong signal reception, and connects seamlessly to your chosen tracking software. If you follow the steps and principles outlined here, your motorcycle will be protected and monitored with minimal effort going forward.
Understanding the Mini GPS Tracker Before Installation
What Makes a Mini GPS Tracker Suitable for Motorcycles
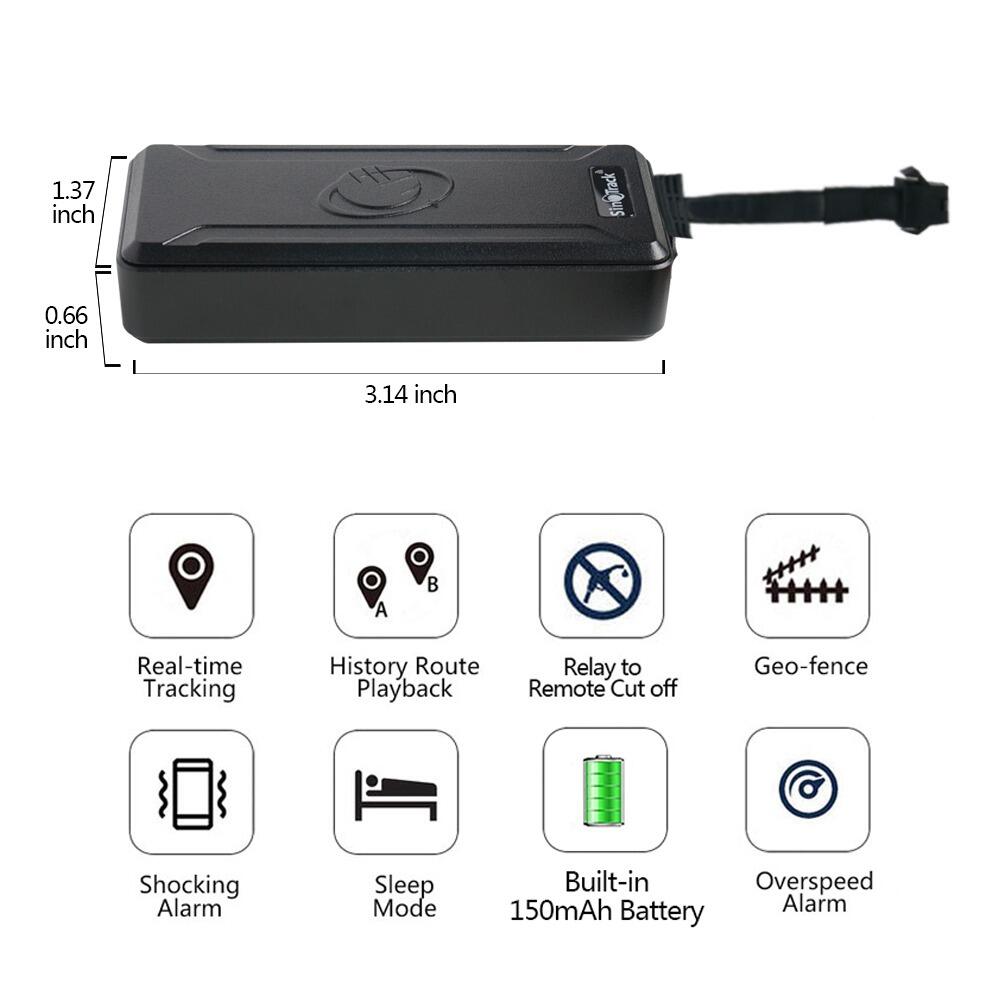
Motorcycles present unique installation challenges compared to cars or trucks. They have limited hidden space, exposure to weather, vibration, and temperature extremes. This is exactly why a compact mini gps tracker is the preferred choice for two-wheeled vehicles. Its small form factor allows it to be tucked into tight compartments, under seats, inside fairings, or beneath the frame without adding visible bulk.
A quality mini gps tracker designed for motorcycles typically supports real-time location reporting over 2G, 3G, or 4G LTE networks. It connects to multiple GPS satellites simultaneously to deliver accurate positioning data even when the bike is parked in a parking garage or urban canyon. Some models also include motion detection alerts, geofencing capabilities, and remote engine cut-off functions that are essential for anti-theft scenarios.
Before purchasing a device, confirm that it is rated for outdoor or at least semi-exposed conditions. IP-rated waterproofing, wide operating temperature tolerance, and vibration resistance are non-negotiable for a motorcycle application. A mini gps tracker that works flawlessly inside a car glove compartment may fail prematurely when bolted near the engine bay of a motorcycle.
Power Supply Options for Motorcycle Trackers
Most hardwired mini gps tracker models draw power directly from the motorcycle's battery, typically operating between 9V and 36V DC. This wired connection ensures continuous power without ever needing to recharge or replace batteries. It also enables additional features like ignition detection, which reports when the bike is started or stopped.
Some riders prefer battery-powered or rechargeable versions of a mini gps tracker for cleaner installation without wiring. These are practical for short-term deployment or for situations where the motorcycle's electrical system cannot be easily accessed. However, battery-powered units require periodic charging and may not support all real-time features when the battery is low.
For most permanent installations on motorcycles used daily or left parked for extended periods, a hardwired connection to the bike's 12V system is strongly recommended. This ensures the mini gps tracker is always powered and can send alerts even when the bike has been parked and the ignition is off.
Choosing the Best Mounting Location on Your Motorcycle
Concealment Versus Signal Strength
The golden rule of mini gps tracker installation on a motorcycle is to prioritize concealment without sacrificing signal reception. GPS signals pass through plastic fairings and most non-metallic panels with minimal loss. However, they are significantly blocked by metal bodywork, the engine block, or the fuel tank if the device is mounted directly beneath them.
Ideal mounting locations include inside the tail fairing behind the seat, under the fuel tank on a plastic tray if one exists, inside the headlight cowl on sport bikes, or within any plastic-covered side panel. These areas offer natural protection from rain and road debris while allowing the mini gps tracker's antenna to receive satellite signals unobstructed by metal.
Avoid mounting the device directly on or near the exhaust system, radiator, or engine cases where sustained heat exposure will damage the tracker's internal components over time. Also avoid locations that are easily visible to a passerby or a thief inspecting the bike before stealing it. The whole point of using a mini gps tracker is to keep its presence unknown until a recovery situation arises.
Securing the Device Against Vibration and Movement
Motorcycles generate significantly more vibration than cars, especially single-cylinder and parallel-twin engines. A mini gps tracker must be mounted in a way that prevents constant movement, which could loosen wiring connections or cause the unit to rattle against surrounding components and create noise.
Industrial-strength double-sided tape combined with a zip tie or a bracket provides a very secure mounting solution for most compact units. If the tracker includes mounting holes, use rubber-lined bolts or grommets to absorb vibration. Wrapping the device in a small amount of foam padding before placing it inside a panel cavity also helps dampen shocks and keeps the unit from shifting.
After securing the device, pull the wiring harness firmly and confirm there is no slack that could get caught in moving parts. Every wire should be routed away from the chain, sprockets, exhaust pipes, and any suspension components. A well-secured mini gps tracker installation will function reliably for years without requiring physical maintenance beyond an occasional check of the wire connections.
Step-by-Step Wiring and Installation Process
Tools and Preparation Before You Begin
Before beginning the physical installation of your mini gps tracker, gather the necessary tools: a multimeter for testing voltage, wire strippers, electrical tape or heat shrink tubing, zip ties, a small screwdriver set for removing panels, and optionally a panel removal pry tool to avoid scratching fairings. Having everything within reach before starting saves time and prevents interruptions mid-installation.
Consult your motorcycle's wiring diagram, which is usually available in the owner's manual or from the manufacturer's technical resources. You need to identify the constant positive wire (always live), the ignition-switched positive wire (only live when ignition is on), and the chassis ground point. These three connections are the foundation of a proper hardwired mini gps tracker installation.
Insert a SIM card into the tracker before mounting it, as accessing the SIM card slot after installation may require disassembling panels. Ensure the SIM card is activated and has a data plan that supports the tracker's reporting interval. Most mini gps tracker devices use standard or nano SIM cards depending on the model.
Connecting Power and Completing the Install
Connect the tracker's red power wire to the ignition-switched positive line or the constant positive line depending on whether you want the device to remain active when the bike is parked. For theft protection purposes, wiring to a constant power source is preferred so the mini gps tracker continues reporting even after the ignition is cut by a thief.
The black ground wire should be connected to a clean metal ground point on the motorcycle's frame. Avoid grounding to painted surfaces, as paint creates resistance and can lead to erratic behavior. Use a ring terminal and secure it under an existing bolt that makes direct contact with bare metal.
Once wired, power on the bike briefly to confirm the tracker powers up and begins its initialization sequence. Most mini gps tracker models have a small LED indicator that blinks during startup and network acquisition. After initialization, the device should connect to the cellular network and begin transmitting location data within a few minutes of being placed in an open-sky environment.
Platform Configuration and Live Tracking Setup
Registering Your Device on the Tracking Platform
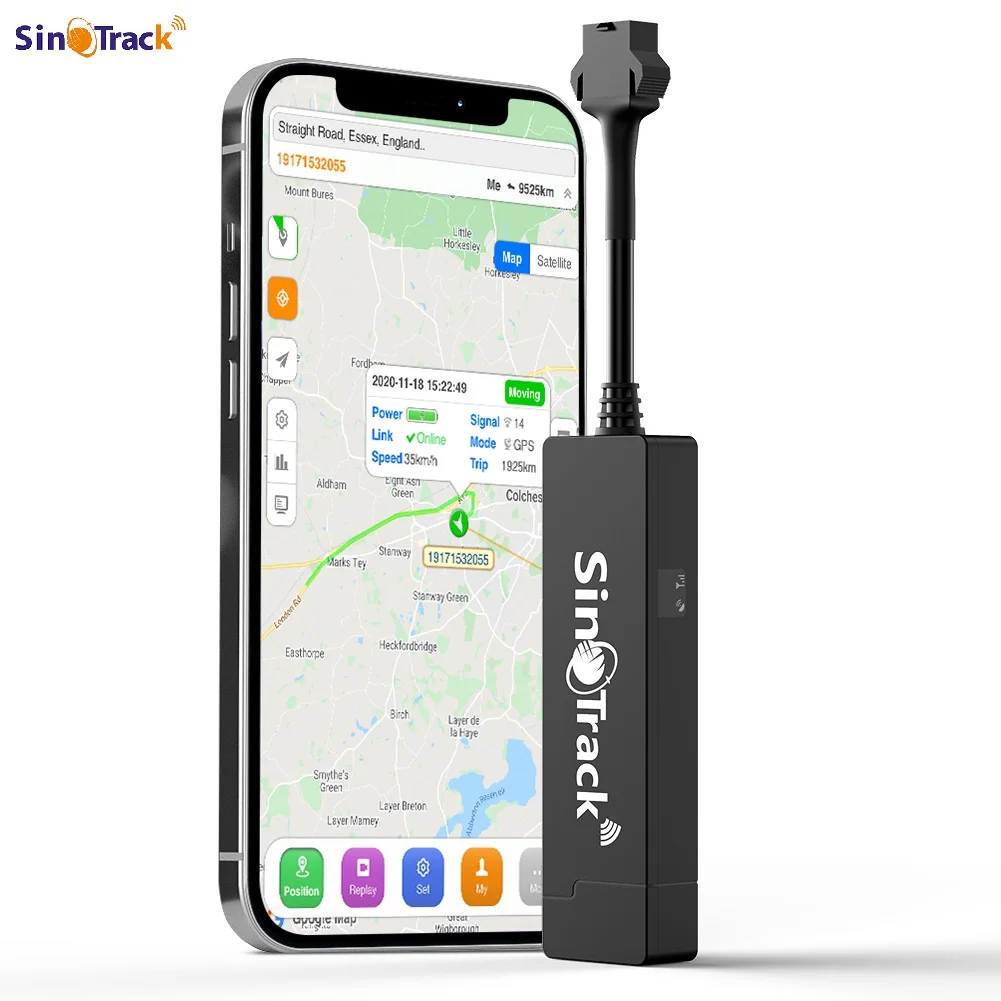
Every mini gps tracker must be registered with its corresponding tracking platform before you can view location data. This typically involves logging into the provider's web portal or downloading their mobile application, then adding the device using its unique IMEI number, which is printed on the unit or its packaging. Registration links your physical device to your user account.
Once registered, configure the reporting interval to match your needs. A 10-second or 30-second update frequency is ideal for real-time anti-theft monitoring, while a 1-minute or 5-minute interval conserves mobile data and battery life for bikes used in fleet tracking scenarios. The mini gps tracker's platform typically allows you to adjust this setting remotely via SMS command or through the web interface.
Test the platform by placing the motorcycle outdoors in an open area and confirming that the location shown on the map matches your actual position. Walk the bike a short distance and verify that the position updates in real time. This live test confirms that the SIM card has an active data connection and the tracker's GPS module is acquiring satellite signals correctly.
Setting Up Geofences, Alerts, and Anti-Theft Features
A geofence is a virtual boundary drawn around a specific area on the map, such as your home, garage, or workplace. When the motorcycle crosses this boundary, the mini gps tracker sends an immediate push notification or SMS alert to your registered phone number. This is the first line of defense against unauthorized movement of your bike.
Configure motion detection alerts so that any vibration or movement of the parked motorcycle triggers an instant notification. This is especially useful in urban environments where bikes are frequently targeted for opportunistic theft. Combining geofence alerts with motion detection means you receive warnings before the bike even leaves your designated safe zone.
If your mini gps tracker model supports remote immobilization, connect the optional relay wire to the motorcycle's ignition or fuel pump circuit as described in the device documentation. This allows you to remotely cut engine power to the bike via an SMS command or the app if theft is confirmed. Always test this feature in a safe, stationary environment before relying on it in a real emergency.
Maintenance and Troubleshooting After Installation
Keeping the Tracker Performing Reliably Long-Term
After installation, the mini gps tracker requires very little ongoing maintenance when properly set up. However, a periodic inspection every three to six months is recommended. Check the wire connections for corrosion, especially on motorcycles used in wet climates or near coastal areas where salt accelerates oxidation. Apply electrical contact cleaner and dielectric grease to prevent moisture intrusion at connector joints.
Ensure the SIM card's data plan remains active and has not expired or been suspended. Some budget SIM plans automatically deactivate after 90 days of low usage. If the tracker stops reporting, always check the SIM card account status before assuming a hardware problem. A simple data top-up or plan renewal often restores full functionality to an otherwise healthy mini gps tracker.
Periodically verify the mounting hardware is still secure. Vibration over thousands of kilometers can gradually loosen adhesive bonds or zip ties. A quick physical check takes less than a minute and ensures your device stays in position and protected from the elements at all times.
Diagnosing Common Issues After Installation
If the mini gps tracker shows an inaccurate location or stops updating, the most common causes are a poor GPS signal due to the mounting location being too close to metal components, a weak cellular signal in a remote area, or a depleted or disconnected power supply. Start by checking the power connection with a multimeter before assuming the tracker hardware itself has failed.
If the device is online on the platform but the location is stuck, the GPS module may be obscured. Try temporarily relocating the tracker to an exposed position to test whether it acquires a fresh fix. If it does, you need to find a mounting location with better sky visibility. Some users resolve this by repositioning the device a few centimeters away from a metal bracket.
Firmware updates are occasionally released for popular mini gps tracker models to fix bugs and improve network compatibility. Check the manufacturer's platform or documentation for update procedures. Keeping the firmware current ensures your tracker communicates correctly with evolving mobile network infrastructure, particularly as older 2G networks are gradually phased out in some regions.
FAQ
Can I install a mini gps tracker on my motorcycle myself, or do I need a professional?
Most riders with basic mechanical and electrical knowledge can install a mini gps tracker independently. The process involves removing a few panels, making three simple wire connections, and configuring the platform via a smartphone app. However, if you are uncomfortable working with your motorcycle's electrical system, having a professional auto electrician complete the wiring portion is always a sensible option.
Will the mini gps tracker drain my motorcycle battery while parked?
A quality mini gps tracker in standby or sleep mode typically draws between 5mA and 20mA of current, which is very low. A standard motorcycle battery can sustain this draw for weeks without the bike being started. However, if your motorcycle is stored for several months, using a battery tender or connecting the tracker to a switched circuit rather than a constant feed is a practical precaution.
How accurate is a mini gps tracker on a motorcycle in urban areas?
In open-sky conditions, a mini gps tracker typically achieves positioning accuracy within 5 to 15 meters. In dense urban environments with tall buildings causing signal reflection, accuracy may drop to 20 to 50 meters. For anti-theft purposes, this level of accuracy is more than sufficient to direct recovery efforts to the correct street or parking lot where the motorcycle is located.
Does a mini gps tracker require a monthly subscription to work?
The mini gps tracker hardware itself is a one-time purchase, but it requires an active SIM card with a data plan to transmit location information. Some tracking platforms are free to use via a web or mobile interface, while others charge a small monthly subscription for advanced features like historical route playback, multiple user access, or priority alerts. Always clarify the total cost of ownership before committing to a specific device and platform combination.